# Roblox DX9WARE Guide
**Setup:**
So, you have just purchased DX9WARE. These are the required steps to configure your PC to run DX9WARE without any problems. If you fail to complete all of these steps, you can expect to see errors.
### Ensuring Maximum Security
If you would like to ensure maximum security to protect yourself from bans and detections:
* Make sure no other kernel anti-cheats are running on your computer.
* After you're done using DX9WARE, restart your system.
### 1. Ensure your windows account is an administrator
It is important that your windows account is an administrator and can run the loader without needing to enter a different username & password.
### 2. DX9WARE Anti-Virus Exclusions
These folders must be excluded from your anti-virus:
1. The folder containing your `loader.exe` and `updater.exe`.
2. The `%appdata%\dx9ware` folder. If you don't see the folder, create it.
We have provided instructions below on adding these exclusions with Windows Defender.
***
The below steps apply if you are using Windows Defender as your antivirus.\
If you are using a third-party antivirus, it will look different, however the same idea applies.
1. [Open the Windows Security app (click for video)](https://www.youtube.com/watch?v=0wr1gIY6G2I)
2. Go to `Virus & threat protection`
3. Click `Manage settings` under `Virus & threat protection settings`.
4. Scroll down & click `Add or remove exclusions`
5. Press `+ Add an exclusion` and choose `Folder`
6. Exclude the two folders from [above](https://docs.cultofintellect.com/dx9ware/initial-setup#1-dx9ware-anti-virus-exclusions)
### 3. Core Isolation & Vulnerable Drivers (Windows 11 Only)
Only required on Windows 11 due to additional security added by Microsoft.
***
#### .bat file
The `.bat` file will perform all of Step #3 automatically. It will disable Memory Integrity & Vulnerable Driver Blocklist via registry and then prompt for a PC Restart. However, if you don't trust it, you can do the below steps manually.
[dx9ware-core-isolation-config.bat](https://docs.cultofintellect.com/assets/files/dx9ware-core-isolation-config-39cbf3e824eb46a85f0bc3e810bb70be.bat)
***
1. [Open the Windows Security app (click for video)](https://www.youtube.com/watch?v=0wr1gIY6G2I)
2. Go to `Device security`
3. Select `Core isolation details`
4. Disable `Memory integrity`\

5. **Restart your computer (important)**
6. Go back to the `Core isolation` page.
7. Disable `Microsoft Vulnerable Driver Blocklist`\
warning
If you are unable to disable this setting, whether it be greyed out, missing or unavailable. You must follow the steps below to disable it via registry.
8. Your Core isolation page should look like this:\

9. **Restart your computer**
#### Disable Vulnerable Driver Blocklist via Registry
You should only follow these steps if you were unable to disable the **Microsoft Vulnerable Driver Blocklist** setting directly in Windows Security.
1. Press the `Windows Key (⊞) + R`
2. Type in `regedit`\

3. Navigate to: `HKEY_LOCAL_MACHINE\SYSTEM\CurrentControlSet\Control\CI\Config`
4. Set `VulnerableDriverBlocklist` to 0\

5. **Restart your computer**
***
## Getting Started
So, you've just loaded up DX9WARE but having trouble with getting started. This could be simply having trouble opening the interface or having trouble configuring it.
For new users DX9WARE can be overwhelming to use.
### Opening the interface
Once loaded, the default key to open the interface is `F1`. This can be changed in the hotkey settings.
***
### ESP
To make this simple for you, the first step should be enabling ESP to ensure DX9WARE will work on the game you are loaded into.
1. Open the user interface
2. Go to `Visuals` -> `ESP` and press `Enable` 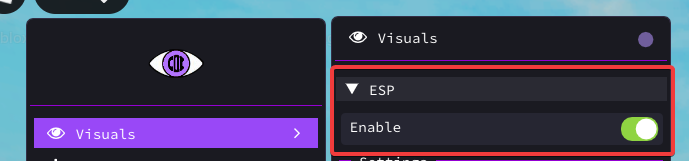
ESP is now enabled, however if you are in a Free-For-All game or a game that does not make use of ROBLOX teams, you should enable `Team ESP`. This is a good way of testing to see if DX9WARE works in your game.
1. Go to `Visuals` -> `Team`
2. Enable `Team ESP`
Close the interface using `F1` again to see the ESP.
***
### Aimbot
Follow these steps carefully to get a basic aimbot working.
1. Go to `Aimbot` -> `Aimbot`
2. Toggle `Enable` to enable aimbot
3. Toggle `Show FOV` *(for simplicity, you can disable later)* 
**The following sections below are important to get aimbot to work successfully.**
**Set Aimbot Mode**
4. Go to `Aimbot` -> `Miscellaneous`
5. Select an aimbot mode. You should select one of two options:
1. **Third Person:** If you are playing a Third Person Shooter game
2. **First Person:** If you are playing a First Person Shooter game. 
**Configure Free For All setting**
6. If you are playing a game with no teams. (Da Hood, Criminality, etc...), then enable **Free For All** otherwise DX9WARE aimbot will not work, because by default it will only lock for players on the enemy team.
**Set Aimlock Method**
7. By default DX9WARE will set aimlock method to `Auto`.\
This **only works on first person games**.\
`Auto` mode will automatically aimlock. If you are playing a third person game or you do not want auto aimlock, change this to `Hotkey button`
**Set Aimbot Hotkey**
8. If you are playing a TPS game or have changed **Aimlock Method** to `Hotkey button`, you will need to set an aimbot hotkey.
1. Go to `Setting` -> `Hotkey`
2. Set a hotkey for either **First Person Aimlock** or **Third Person Aimlock** depending on what kind of game you are playing
9. Close the interface and begin aimbotting by holding down your hotkey if set. DX9WARE will only aimbot on players **in your FOV** and **in range** *(configurable in `Aimbot` -> `Modifiers`)*
***
### Character hacks (Fly, Desync & etc.)
**Follow these steps to properly use the extra features.**
1. Go in the `Extra` section -> Expand `Character Hacks`.
2. Enable the feature you want (ex: Fly, Noclip) 
3. **Bind** the feature. Go in `Setting` -> `Hotkey` and then bind the feature you toggled before. 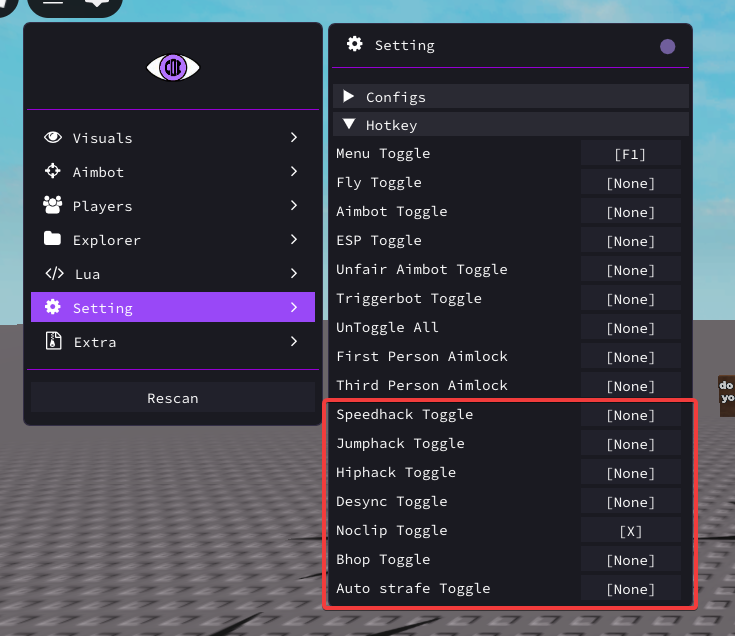
4. Now that you binded it, press the hotkey on your keyboard and see the magic happen!
💭 You can also view all the hotkeys on your screen and when the features are toggled or not! It's in the `Extra` section.
***
### Teleporting Between Games
If you are teleported between games, you need to press the **Rescan** button on the menu.
Still not working?
If the aimbot or ESP does not work, it means that the game uses custom character models.
A way to check on some games is to head into "Players" and check if the players' in-game names are showing up.
***
**Troubleshooting:**
{% content-ref url="roblox-dx9ware-guide/troubleshooting-dx9ware" %}
[troubleshooting-dx9ware](https://deathless-services.gitbook.io/deathless-services/product-guides/roblox-dx9ware-guide/troubleshooting-dx9ware)
{% endcontent-ref %}